Thursday, April 12, 2012

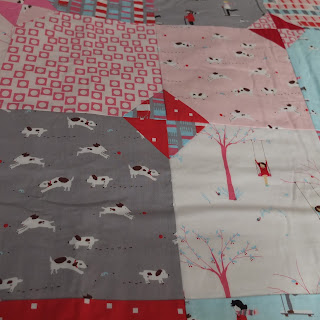
This is why it's called Swoon


If you've been paying attention, you'll know that I'm a big fan of Ruby (and it seems that a lot of others are too!)

When Camille's beautiful Swoon pattern came out in May last year, I might well have been one of the first people to buy it. But I wanted to wait for Ruby to come out, because I just absolutely adored her version of it (you can see it here). As luck would have it, the clever people at Fat Quarter Shop put together a kit for Swoon in Ruby, and I snapped it up late last year and got to work.

Individually, the blocks are beautiful. I've enjoyed every single one of them.


But together, they're something else again. This is why this quilt is called Swoon, because that is what you can't help doing when you see it. (By the way, it's a mahusive quilt - around 80 inches square, requiring furniture to be moved...)


Thanks Camille, for an awesome pattern, and beautiful fabrics. This is a very special quilt I'll treasure forever.

Linking up today to Lee's Work-in-progress Wednesday and Our Creative Spaces.


Wednesday, April 11, 2012

Fat Quarterly


Have you seen me? I'm on the Fat Quarterly blog with my curvy cushion. Please pop in and say hi and check out some of the other curvy projects too.


Thursday, April 5, 2012

Here's something new!


It's about time this quilt saw the light of day - it's been complete for quite a while now and just waiting for its moment with the long arm quilter! Only the other day I realised with a slight sense of horror that it's almost a year since I started it - in May 2011 to be exact. Sherbet Pips was one of those fabric lines that I waited on with great anticipation and chopped into almost as soon as it arrived in my letterbox.

The pattern is one I came up with myself, and I even went the whole hog with the pieced back (which took pretty close to forever, by the way), and which I think makes the quilt as close to a double-sided quilt as you're ever going to get!

It's destined for my little girl's bed, just as soon as the long arm has done its work - which will hopefully be within the next couple of week! I'm really not sure why, but this quilt makes me think of a box of chocolates... Or maybe that's just because it's Easter this weekend. Anyhoo.


If anyone is interested in a tutorial for this pattern, please let me know! It's really quite a simple pattern and very quick to throw together.

In other news... I've been busy Swooning. This is block number 6 and could be my favourite so far. Block number 7 is nearly finished and then we're a cool two blocks away from completion. Hoping to finish up pretty soon so that this can go to the longarmity place together with Miss Pips up there.

Linking up today to Our Creative Spaces and Work-in-Progress Wednesdays.

Happy Easter everybody if you're celebrating. Don't eat too much chocolate :)

PS Have you seen this? I love fabric, but this one has got my heart racing. Very excited - only another 6 months to wait...

Sunday, April 1, 2012

Curvy

A little teaser - I was lucky enough to try out the 'Quick Curves' Ruler for Fat Quarterly magazine, and this is the result. It will be featured on the Fat Quarterly blog in the next little while - I'll be sure to let you know when it's up!

Tuesday, February 28, 2012

Whirligigging


Please forgive me my little hiatus (again). I've been a little distracted, as you can see.


Lots of gorgeous details in this quilt which have kept me wanting to press on to the next stage. I thought I'd be far too bored cutting out 240 squares of scraps and sewing them into random tab shapes. But no! It was a bundle of fun. And that's said without the slightest sense of sarcasm.


I mean, look at them - eep!!


This is undoubtedly the biggest, scrappiest (in terms of delving into the scrap bags - there are a few of those. Come on, I know you've got some too!) quilt I've ever done. Such a dent has it made in my scraps that I would have trouble starting another scrappy quilt in a hurry. OK that may be an exaggeration. But the problem would be, the scraps would look very familiar and that might get boring...

The only hiccup in the whole process was the doubt that set in once I'd pieced the large setting triangles. I just wasn't sure the fabric (Loulouthi by Anna Maria Horner) was right and that it might detract from the centre. I was persuaded otherwise by a bevy of Twitter friends and pressed on and am happily in love again.

So - I've thoroughly enjoyed this little journey - and a rather quick one it's been too, I only started this at Christmas. I know there's a huge hand quilting palooza ahead of me (more on that another time), but it is so fabulous to get this far. I hope I've done Sarah Fielke's amazing pattern justice.

If you'd like to make your own Whirligig, you can find the pattern in Sarah's gorgeous book 'Quilting from little things'. I highly recommend this fabulous book, if only for the amazing quilt eye candy. But also for the Whirligig. I love it.

PS Sarah was lovely enough to feature a progress pic of my quilt on her blog - see if you can spot it!

PPS And because it's been such a long time since my little petal featured here, a couple of pics of real live peeps, not quilts.

Linking up to Lee's Work in Progress Wednesday today, and to Our Creative Spaces.

And this being virtually the only thing I've worked on in the past month, I'm linking up to Lily's Quilts Fresh Sewing Day too! So if you're coming from there - hello!


Butter wouldn't melt in her mouth. Seriously.

Thursday, January 26, 2012

Desperate Housewife's Quiltalong: Round the Twist


I'm so excited that my first ever block tutorial is for the very fun Desperate Housewife's Quiltalong, hosted by the lovely Jane. If you haven't seen the amazing range of blocks on offer, one a week from Jane, and one a week by guest bloggers, then pop on over once you've had a look at my tutorial!

This little block of mine is called "Round the Twist", because I'm sure any desperate housewife worth her salt has been driven round the twist once or twice. I know I have.

I based this block on the flying geese unit, which I'm currently obsessed with. And we're going to make it using the magic method, which I'm currently obsessed with. If you love to chain piece then you're going to love this. And if you've been scared of making flying geese, be scared no longer! This really is magic. And you will save yourself some fabric, too! That's got to be a good thing, yes? My flying geese obsession has led me to this Ruby quilt. And of course the Swoon quilt.

(note: there are numerous tutorials around the web teaching this method. This one at Connecting Threads gives measurements for flying geese in whatever size you like - handy!)

So, choose some fabrics from your stash. You'll need two contrasting colours for the twist, and a light or neutral for the background. My print fabrics are from the Loulouthi collection by Anna Maria Horner, which I'm, well, maybe just a little bit obsessed with. The neutral is actually also a print - a text print from the Make Life collection by Sweetwater. I'm currently experimenting with using less solids and more prints in their place, and also text fabrics. I need some more. Anyway. Back to the block.

You'll need the following pieces for your block:
One square of print fabric a - 5 3/4 inch.
Two squares of print fabric b - 3 1/8 inch.
Two squares of neutral fabric - 3 1/8 inch.
Four rectangles of neutral fabric - 4.5 by 2.5 inch.

(And apologies for the big shadow in some of these photos. Sewing at night is a necessity in this household and doesn't make for good camera work!)


Layout your big square and then the two neutral squares in opposite corners. They will overlap slightly in the middle to form a little square. Make sure this overlapping part is really square, and not a rectangle. Now draw a line from corner to corner.


Now stitch a line 1/4 inch both sides of the drawn line. Here's where the chain piecing part comes in handy. If you are making a lot of flying geese blocks, you can simply prepare the above units, stack them up and whiz away. They'll be done in no time. At the very least I like to make two blocks at a time, because it's more time efficient and you're not cutting the thread at the end of each and every seam.

Another important tip when sewing is to use a *scant* 1/4 inch seam. This means just a thread or two shy of a full 1/4 inch. Trust me - if you haven't tried it, you must - it makes for much more accurate piecing. Get out your ruler and measure your seams and you will see what I mean. If your foot is travelling outside the line, your seam is actually a bit bigger than 1/4 inch, and over multiple blocks or several pieces to a block, that adds up to a lot. But I digress!

Once you've sewn down both sides of the line, cut the piece in half, right on the drawn line. Then flip the little triangles over and press (I find it easier to press towards the small triangles).

Now take your other small squares and place them in the remaining corners of the two (now separated) units, again, it should overlap the two flappy triangles with a tiny square in the middle. Feel free to wiggle it into place to make sure it's lined up properly. Then sew either side of the line as before and cut the unit into two pieces. Flip those triangles over and press, repeat with the other unit and ta-da! You have made FOUR flying geese in just a few simple steps.

But we are not quite finished! The goose unit needs a little trimming to whip it into perfect shape. We are aiming for a unit of 4.5 by 2.5 inch. Have a look at your unit and you will see it needs a little haircut. Start with a short side as in the photo below. Line up the opposite side on a line on your cutting mat, place your ruler 1/4 inch back from the nearest line and trim - you might find that you don't actually trim a full 1/4 inch off the block, but we are just paring back each side as needed to get to the 4.5 by 2.5 inches required. Rotate the block to cut the long side with the point of the goose and cut again - there should be a seam allowance of 1/4 inch from the point to the edge! Repeat for the two remaining sides and you'll have a lovely 4.5 by 2.5 inch flying goose.

Now lay out your geese with the neutral rectangles as shown, and sew each rectangle-goose pair together, and press (the direction is not so important here, so whatever feels right).


Now you're ready to sew the pieced units together. If you want your geese to have nice sharp points, then have a look at the units next to each other - see how the points are a nice 1/4 inch from the edge? We want our seam to go right through those points. If it doesn't, you'll end up with poor cut-off goose wings. Eek!

If for some reason you've ended up with a smaller seam allowance poking out above those points, don't worry, you just need to make sure your needle goes through the intersection point. If you do this, you'll still end up with pointy wings, albeit with slightly smaller seam allowances. But no-one's going to know!


Easiest way to do this is put a pin right through the intersections on both pieces.


Before you press the paired up units, check which way you want them to lie. I like my seam allowances to nest, so I press one unit with the seams going to the left, and the other going to the right, then they nest nicely. Again, before sewing together, check your goose points to make sure your seam goes straight through that intersection!


And there you have it, one Round the Twist block! I hope you've enjoyed this one and hopefully learnt some tips about making flying geese. If you give it a go I'd love to see a pic. And now do go and have a look at Jane's blog for some super-clever blocks.

Wednesday, January 25, 2012

I started something new


It's been a little while since I've blogged. The silly season put blogging and sewing fairly firmly on the back-burner. But 2012 has started with a bang and I've been sewing up a (relative) storm. Current big project is a hand appliqué medallion from Sarah Fielke's beautiful book. A fabulous book that every aspiring quilter must have!

I started this one when we were away over Christmas and have been making steady progress. LOVE hand-applique. Once all the leaves are sewn on there are a number of borders to be added, and then the whole she-bang gets a rather intense hand-quilting treatment. So I'm expecting this one will take a while. But I'm not in a hurry, and enjoying the journey....


Linking up to Lee's Work-in-Progress Wednesday for the first time in an eternity.