Sunday, December 29, 2013

That was 2013


Another year almost over! Who can believe it? The last few months of the year have been particularly manic, and added to that has been my return to work a month ago (I took this year off on long service leave, it went by in a FLASH). Needless to say, I tried to squeeze in a bit of sewing, not anywhere near as successfully as I had hoped for, but nonetheless, I did my best.

I've taken on quite a few new projects this year, all big ones, and haven't really ticked much off my to-do list (including both the ones that were already in progress last year, and the ones I'd planned but not started). I did finally eke out a sleeping bag for each of my three kids - long-promised. Above is Elli's, pink of course! The pattern is by Flossie Teacakes and was very easy to follow. I often hesitate to sew little projects because I find them so fiddly, but this was not at all. I made all three in just a couple of hours.


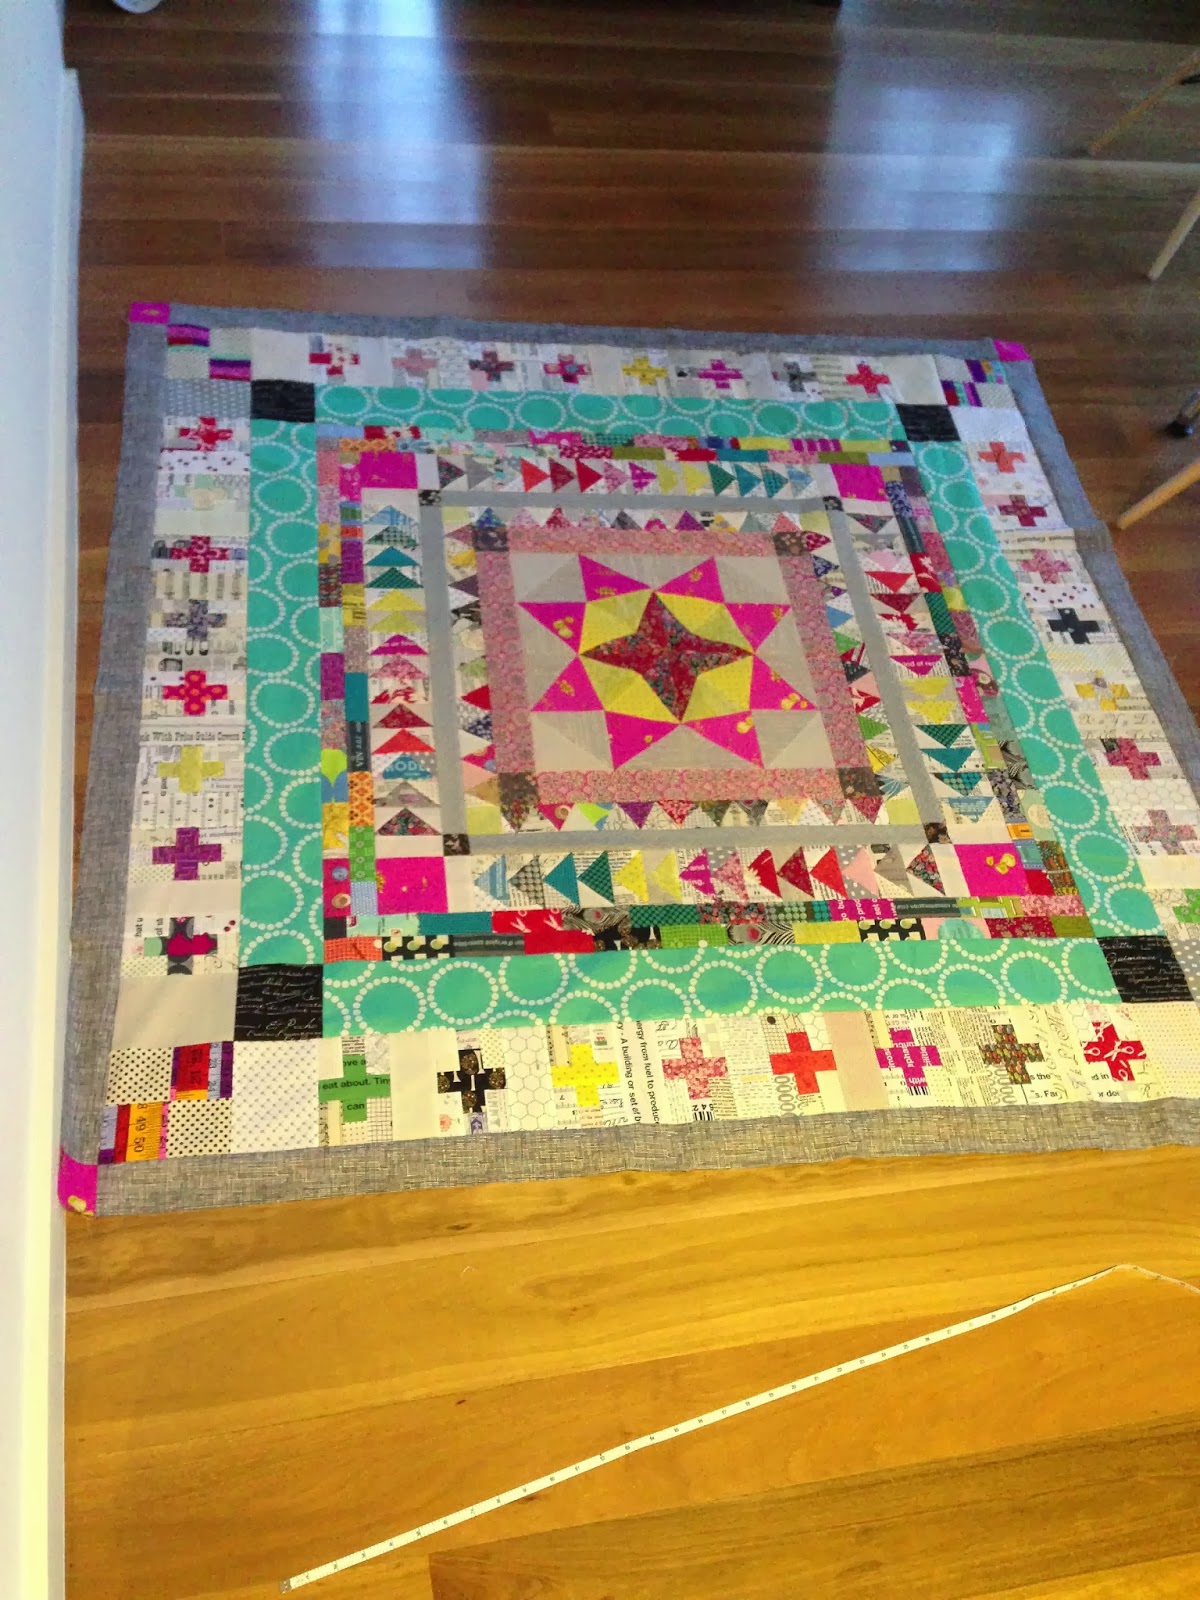
The Marcelle is finished and currently in a state of half-quiltedness. Hopefully I will finish it in the not too distant future. This quilt did my head in a bit. I was glad to see the end of it!


I've made two Anna Maria Horner St Louis 16 patches this year, one of which is on our bed, the second still needs to be quilted. Such a great pattern (and quick!) and perfect for throwing together a huge bunch of your favourite fabrics.


I've been quilting along in the Amitie Bring Me Flowers block of the month. I'm only about two months behind, which is not too bad! Lots of applique in this one, my favourite!


I learnt to do paper pieced letters - and I love it! These ones are for Catherine.

Another one awaiting quilting, a simple subway tile pattern made up in Floressence (by Art Gallery Fabrics), with a few others thrown in. I love this one so much. This will be going to live with my aunt.


Finally, you might notice in the sidebar (and if you follow me on Instagram you may already know this) that we now have a shop! Jeannette and I started Polka Dot Tea Fabrics in October. We're running a little store on Etsy where you will find a selection of gorgeous Japanese texty, floral and geometric prints, and some other goodies. We're building up our stock of Michael Miller Cotton Couture solids (our absolute favourite solids - so lovely and soft and beautiful to sew with). If you're feeling the need for a little post-Christmas fabric shopping, pop on over and have a look. We have a sale on at the moment - just enter January at checkout for a discount of 20 per cent (minimum purchase is $24). Sale finishes on 5 January. We hope you'll come and have a look, and especially for my fellow Aussie readers, we'd really love to encourage you to shop locally! Particularly as the dollar is falling at the moment, it's going to become much better value to keep some of your fabric custom at home. Thanks to everyone who has supported us so far. 

Happy New Year!

Danielle x

Monday, September 9, 2013

A new project - and a quiltalong!

I've been quilting as much as I can (which some weeks is not very much, unfortunately) and not blogging, as per usual. One project I've just started is the Marcelle Medallion, which I've wanted to tackle ever since I first saw versions appearing around the start of the year. It was bumped to the top of my to-do list thanks to the intervention of Penny and Jeannette. Penny is hosting a quiltalong on her blog - you can find the homepage for the quilt along here - and Jeannette and I are going to help out a little along the way.

So my job here today is to help you out with the piecing of the centre medallion. Penny has already given us a couple of great and super-detailed tutorials for the medallion, using English Paper Piecing and foundation paper piecing. I thought I would try a slightly different paper-pieced method, namely freezer paper. This is a fairly new-to-me technique but one which I'm sure I will use a lot more of in the future. It's perfect for slightly odd-shaped blocks where there are points coming together at odd places. The medallion in the centre of this quilt is the perfect candidate. There are triangles, but they're not your usual-shaped triangles. And there are y-seams! But fear not, I forged ahead, and though I'm not quite finished (I've got three of the four segments done) I'm confident it's going to work out fine.

Freezer paper piecing is similar to other types of paper piecing insofar as you are really only dealing with the EXACT (finished) shapes. You sew only on the boundary of the shape, not within the seam allowance, point-to-point. You could, technically, do all of this without the freezer paper (and that is how the instructions in the book are presented), but the freezer paper just gives you some extra stability, and extra assurance that you are sewing in the exact spot that you need to.

So first thing you need to do, is trace all of your template pieces onto freezer paper - sewing lines only! Cut out carefully on the lines and label each piece (I found it useful to also write on the paper which fabric I was using with each piece, so as to avoid any mix-ups - there are several pieces which look similar and it would be easy to make a mistake). Also note you will need to make two copies of the AB template. (I made the medallion one quarter at a time, re-using the paper pieces each time). Press the piece onto the reverse of your fabric and then trim around it adding in a scant 1/4" seam allowance. You can see in the picture below that the 1/4" line on my ruler is just a tiny whisker inside the edge of the paper. That's what I mean by scant.


I might also point out here that with this method you will end up with pieces that appear to be the mirror image of the way the pieces look in the book. Don't worry about this, your medallion will look exactly the same in the end. Just take care to orient the pieces correctly when pairing up matching seam lines - if you are looking at the diagrams in the book, your pieces will be mirror images so take that into account.


Pair up your two AB pieces first and take them to the machine. Make sure the papers on each piece are exactly lined up. Line up your needle to start exactly at the point of the triangle (exactly next to the point of the paper). Sew carefully alongside the edge of the paper to the end point. You can take a couple of backstitches to secure if you like. Press seams (I mainly pressed the seams open, especially where there were many seams coming together). Pair up all the other pieces and sew in the same manner.

When you come to sew a pair to another pair, the principle is the same. Push or fold the seam allowance out of the way, and start with the needle exactly at the start of the sewing line (this should coincide with the end of another seam - if it's not exactly at the same point, you will end up with a little gap).


Sewing in the corner squares is where your y-seam comes in. Take it slowly, sewing one side at a time, from the centre out to the edge. Take care to line the pieces up under your machine's foot, so that the needle comes directly into that critical starting point.


A note about the papers - when I sewed the first quarter, I took the papers off after sewing each initial pair. With the second quarter, I decided to leave the papers on when sewing pairs to pairs and I think it gave a better result.

Any questions? Please leave your questions or comments and I'd be only too happy to help!

I can't wait to see how everyone's going with their centres! Good luck!

PS Don't forget to share your progress on Instagram with the hashtag #mmqal.

Sunday, August 18, 2013

A little blogging...

Despite best intentions, I've once again fallen out of the blogging habit (not that I could really genuinely call it a habit, being as infrequent as it is!) That's due in part to the ubiquity of Instagram. I really love it for its quilting and crafting community, the ability to share things the minute you've finished them, or when you're in the middle of doing something and need some instant advice on what colour goes where, or how to do a certain technique - you can guarantee someone is lurking in the wings to offer their advice.

And so I've been resorting to Instagram for my 'microblogging' fix. But this weekend, Instagram decided to chuck a hissy fit and not work. Help! What to do? A little discussion on Twitter ensued, and a few of us decided to put up a blog post on our long-neglected blogs, in substitute for lack of Instagramming over the weekend!

So here's a little taste of what's been happening chez Petitselefants this weekend.


Binding a little baby quilt. So pleased to cross this one off my to-do list, it's been sitting around for a few weeks now and the baby it's heading to is nearly 8 weeks old.


I put this together from 5 inch squares cut from my stash, mainly Bonnie and Camille leftovers from other projects. Sixty-four squares in rows of eight make for a quick stash-busting quilt.


And this is a little sneak peek of a quilt I've been working on for a little while. It's all finished now and we've been trying to get some fancy half-decent shots of it as it's going to be published in a book!  Very exciting, and I can't wait to show you the whole quilt!


So there you go, my non-Instagram blog post. Hope you're all having a lovely, quilty weekend.

xo

Thursday, May 23, 2013

A little knitting


Many moons ago, I used to knit cardigans and jumpers, for myself and my family. Big projects that took a lot of time and concentration. Nowadays I'm all about mindless knitting. Enter the scarf, the shawl and the cowl. Repetitive knitting that can be done in front of the TV, at soccer practice, any place where it is likely that one will be interrupted by a small child.


I'm already on to my third version of this scarf. It's an easy four-row repeat that is simple to remember - no chance of getting muddled up with where you are in the repeat. And just a little bit of a twist in the pattern to keep things interesting. Regardless of how mind-numbing you want your knitting to be, we don't need the endless monotony of acres of stocking stitch or 2x2 rib, do we?


I picked up this lovely squishy Blue Sky Alpaca/Silk yarn on my visit to Purl Soho in New York in January, and now have gifted the resulting scarf to my lovely aunt who recently celebrated a significant birthday.

I knitted this in fingering weight (4 ply), but the first version was lace weight (2 ply). Version 3 is also fingering weight. It gives a nice skinny, long scarf. Just the way I like them!

If you'd like to try making your own - here you go! The pattern came with the original skein of lace weight yarn, purchased by my Mum somewhere in deepest, darkest Canada. I'm afraid I've misplaced the info about the shop. If anyone recognises this stitch pattern please let me know so I can provide the credit!

Cast on a multiple of 4 + 2 stitches (I cast on 34 stitches). EDIT: I used 3.75mm needles to give a nice open gauge - but use whatever you feel comfortable with. It's a scarf, the gauge is not hugely important.

First row: K2, P2 - repeat to last 2 stitches, K2 (wrong side)
Second row: K2, *K1, yo, K1, P2 - repeat from * to last 2 stitches, K2
Third row: K2, P3 - repeat to last 2 stitches, K2
Fourth row: K2, *sl1, K2, psso over both stitches, P2 - repeat from * to last 2 stitches, K2

Repeat until it reaches your desired length (I think the rule of thumb for a scarf is knit it the length of your body!) Two skeins of Blue Sky Alpaca (total 100g) yielded the perfect scarf.

Basically, you're making an extra stitch in the second row, and an eyelet, and in the fourth row, getting rid of this extra stitch and in the process giving it a little cable effect. Clever!

Next up I'm planning on something a little more challenging - a lace-edge shawl, knitted up in Swans Island fingering weight from Suzy Hausfrau. I'm itching to get started on it! 

What knitting projects are on your sticks at the moment?


Friday, May 10, 2013

Hand Quilted with Love by Sarah Fielke


Like many of you, I waited patiently for this lovely book to materialise, having been tempted with a few sneak peeks here and there by Sarah over Instagram and Twitter. Just those few little snippets were enough to know that this book would be amazing, and it certainly is! 
Material Obsession books one and two have been staples on many quilters' bookshelves for ages. Who hasn't spent a good hour or two re-reading and flicking through, soaking up the colour? Sarah's first solo book Quilting from Little Things was just as beautiful and full of inspiration. And now we have Hand Quilted with Love, which is (to the relief of some) not just about hand quilting, although this is Sarah's preferred method of finishing her quilts, but more about Sarah's making of the quilts she's always wanted to make. Her passion for her craft shines through in the way she describes the inspiration for each quilt, and in the luscious photography.

I was lucky enough to be given a head start on one of the quilts from the book and being a big fan of appliqué I was quick to choose Millefiori. This quilt was a huge challenge for me in terms of colour selection, and this is not the kind of quilt where you want to play it safe - better to go bold or go home! And I'm happy to say I'm so proud of how this has turned out. Big thanks to Sarah for giving me the push I needed to test my colour boundaries and try some new things.


This is a bit of an epic quilt to make, being as it is almost 100 per cent hand-sewn (appliqued and quilted). But in the scheme of things, it hasn't really taken me all that long to make - working mostly in the evenings, I started this around three months ago and it's almost finished. Even the hand quilting (using Perle 8 thread) has been quick - I'm nearly done and started less than two weeks ago. I really do encourage anyone who's been put off by the idea of hand quilting to think again - using Perle 8 thread makes everything go much faster and it's really satisfying to see the quilt come alive with each shape being outlined in a different colour thread. The book provides lots of tips and tricks on both hand quilting and needleturn applique, and you can see Sarah's hand quilting technique in action (and how to make perfect applique circles) thanks to the wonders of YouTube on her blog.

Incidentally, I also made a version of the fabulous Whirligig from Sarah's previous book, and it is still awaiting its hand quilting moment in the sun. After this experience with Millefiori, I'm well and truly inspired to take it out of the cupboard and finish it!


But back to the book! I'm already daydreaming about what other projects I'll make. While the Made to Measure medallion quilt from the book's cover is definitely a contender (I love Lynne's version, and there are quite a few others popping up now), I think I'll tackle this fabulous checkerboard design with its applique border. I have been hoarding stacks of Kaffe Fassett and Keiko Goke colours which would be perfect for it.


And this teapot and cup one takes my fancy too! Just to name a few!

Be sure to visit the other stops on Sarah's bloggy book tour and see what other beauties have already been whipped up. You can pick up a copy of the book from Book Depository or direct from Sarah's website.
SewTake a Hike - 4th May
Belinda Stitches – 5th May
True Up - 6th May
LilysQuilts (UK) - 7th May
Creative Dabbling (Australia) 8th May
Mrs Schmenkman Quilts (USA)9th May  
I'm A Ginger Monkey (UK) - 10th May 
Petits Elefants -(Australia) 10th May
Prints Charming (Australia) - 11th May
RedPepper Quilts (Australia) - 12th May
HandMade by Alissa (USA) - 13th May
Meet Me at Mikes (Australia) - 14th May
Sew Mama Sew (USA) - 15thMay

Wednesday, May 1, 2013

Adventures in hand quilting


One thing I've noticed about the projects I'm taking on now is my determination to just get. them. done. I have so many quilts on my 'bucket list' that if I don't get wriggling, I'm going to be 98 before I've made half of them. In my mind (I'm too scared to write too much of this down) there's a list of the quilts I can do this year, and next year. And a list of the quilts that I'll think about at some point. Most of the quilts on the first list I have the fabric for, give or take. I suppose technically this should mean no more shopping, then hey!

Anyway, I digress. I started Millefiori around the time school went back this year in early February, and have been working on it fairly solidly most evenings. Now the top is finished. And rather than let it languish in the pile of unquilted tops, this time I'm going to finish it! And it deserves the full hand-quilting shebang, don't you agree?

This process may look like it's not for the faint-hearted, but it's really not that bad! The basting is a bit of a palaver, taking place as it does hunched on the floor for several hours. But it was finished well before I thought it might be. You take long stitches, working from a gridline at the centre out (use a new piece of thread each time, starting on one of the centre lines and working out to the edge). Secure the end of the thread in the batting with a couple of little stitches. The rows are around 6 inches apart.

Working flat on the floor, it can be a little hard on your hands and wrist. You can use a little teaspoon to  help 'lift' the needle up as it comes through. I used this technique on and off throughout the process and it worked quite well but I found I didn't need it all the time. Perhaps that had something to do with how tired my hand was feeling! Speaking of which, don't expect to get this done in one go! This quilt is around 60 inches square and I estimate that it took around three hours to baste, in sessions of half an hour or so.


And since Sunday I've been quilting merrily away, using Perle 8 thread. This is also going faster than I had imagined and so far I'm loving the process! Once again, a little hard on the hands, and I need to remember to take some breaks (including all of today)!


So there you have it, I'll be back with some more progress pics soon! And I'd love to hear about your hand quilting adventures, please leave me a comment! Do you love it, hate it, haven't tried it but want to?

This doesn't happen too often (but maybe it'll happen more often from now on), but my blogging actually coincides with Lily's Quilts Fresh Sewing Day, so I can link up for once. Hurrah! If you've come over from Lynne's, thanks for popping in!


Lily's Quilts

Saturday, April 27, 2013

Anyone still here?

Well hello there! It has been an insane number of months since I last checked in. If you happen to follow me on Twitter or Instagram (I'm @petitselefants on both), you will vouch for the fact, however, that I haven't been sitting around on my behind idly twiddling my thumbs!

First reason for the rather lengthy hiatus has been the six month house extension/renovation project. We moved out on September 28 last year, and moved back in exactly six months later on March 28. 


Herewith a few photos to prove it. I really need to get my act in to gear and take some better photos and assemble a few before and afters. The house is totally transformed, it feels like a new house! Above is the new living/dining space, and through the window on the right of the picture is a glimpse of my new studio (still awaiting furniture and unpacking of fabric).


There are still a few things left to finish off (including a balustrade on this staircase - happily the kids have actually listened to us for once and don't play silly horses on the stairs. They do that elsewhere - ha!).

My kitchen. I LOVE the kitchen. It's about trebled in size from what we previously had. And behind those red doors is a butler's pantry. I have yet to work out when the butler is arriving though.... It's so hard to find good help these days!


On to things quilty. When I haven't been organising house-y things or chasing after kidlets, I've been busy for the past three months working on this little quilt. It's called Millefiori and you'll find it in Sarah Fielke's beautiful new book Hand Quilted with Love, recently released. If you don't have it yet, please consider purchasing it for your quilt library - it's absolutely gorgeous. My version of Millefiori will be popping up again soon when Sarah runs a blog tour of her book in coming weeks!


Just one more thing before I go - have you heard of Craftsy? They have a library filled with online video classes in all things crafty, not just quilting but pretty much anything you could think of. You purchase the class of your choice and have access to it forever more. I've downloaded a few and I have to say they're really fabulous! So far I've tried Angela Walters' machine quilting class, Sarah's 'Big Techniques from Small Scraps' class and Camille Roskelley's 'Pre-Cuts Made Simple' class. It's so fun being able to watch these ladies do their thing - the next best thing to taking a class with them in person!

Speaking of Angela Walters, in my next post (no, not in six months), I'll show you my quilt that she quilted for me! It's just a little bit awesome.